Running an Node app in ECS Fargate with HTTPS
TL;DR Running a containerised Node web application in AWS’ Elastic Container Service (ECS) can get tricky when you want HTTPS
We want to set up a simple holding page for our NFT marketplace while building out the actual application. We’re running a simple Next.js app in AWS Elastic Container Service using Fargate’s serverless compute provisioning to retain complete infrastructure control and keep our DevOps skillset sharp. Massive overkill for not even half a web page of static content, but Massive and Overkill are my middle names.
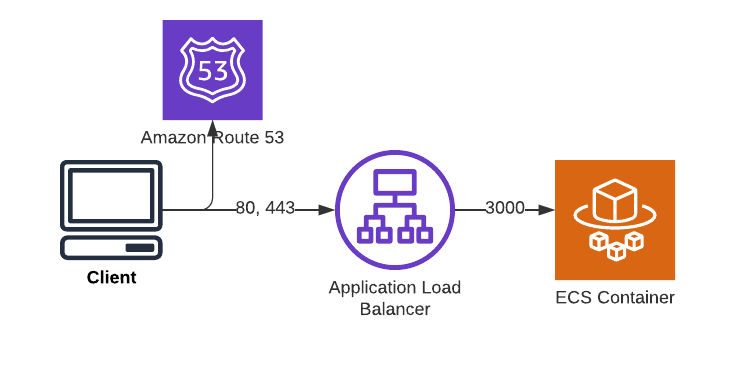 Our target setup is a site hosted in a container in Fargate, accessible using SSL at our desired domain name, Tokey. app. The trickiest thing here is that our application runs in Node JS, serving at port 3000. We’ll be implementing a Load Balancer that doesn’t just redirect inbound HTTP to HTTPS but also ensures that all traffic ends up at port 3000 on the Container.
Essentials
There is a non-trivial amount of work required to get to the launch phase. You’ll need to have:
- a Dockerised Next.js app uploaded to ECR
- a Route 53 Domain name (in this case, we’re using tokey.app)
- an SSL certificate provisioned via Amazon Certificate Manager (ACM)
We’re not covering how to do these today. If they’re things you don’t know how to do yet, this tutorial is definitely too advanced for you. You’d be less frustrated and move faster by going back a few paces.
Create Task Definition
In ECS, choose Task definitions on the left menu, then the orange button Create new task definition. Add the name of your Container and copy across the Image URI from the ECR. Change the Container port to 3000 in the Port mappings section. Click Next.
On the next screen, ensure the App environment is Fargate. Set appropriate values for your runtime CPU and Memory. We’re using one vCPU and 3GB of memory for our simple static page. Ensure the Task role is ecsTaskExecutionRole. We don’t need to change anything else as we’re not storing any data, and we don’t worry much about monitoring. It’s just a holding page. We can use the defaults here. Click Next, then Create.
Create Security Group
Our Security Group (SG) will only allow traffic to specified ports and from selected locations into our application. We will use the same SG for the ECS Service as the Load Balancer. We need to create an SG that allows traffic to ports 3000, 80, and 443. This combination of rules will allow ‘internal’ traffic to our containers running the app and inbound requests from the internet.
On the EC2 Console under Security > Security Groups, choose Create security group. Give it a meaningful name and description, and add three inbound rules:
- HTTP on port 80 from Anywhere IPv4
- HTTPS on port 443 from Anywhere IPv4
- Custom TCP on port 3000 from Anywhere IPv4
Click Create security group.
Create Load Balancer
If you’re slightly more advanced, you can create the Application Load Balancer while you’re setting up the ECS Service. Here, we’re going to do it as an independent exercise to visualise the chain of infrastructure better. Again in the EC2 Console, choose Load Balancers, then Create Load Balancer.
Choose Application Load Balancer (not Network or Gateway) and click Create. Give it a meaningful name and then map it to all the Availability Zones possible under the Network mapping section.
In Security groups, choose the SG you created above. Then, change the default HTTP listener to HTTPS in the Listeners and routing section. Under the default action section, select the Target Group you created above. You’ll also have to specify the Default SSL certificate when you do this. You should have already provisioned this as part of the prerequisites.
Click Create. It’s relatively fast to create one, which is nice. We need lastly to ensure that people still get the SSL version of your application even if they come via HTTP. Click Add listener on the main screen for your ALB. On the following screen, create a redirect to HTTPS on Port 443. Leave the default options untouched and click Add.
Alright, we’re most of the way there. We have laid the pipes for moving traffic from the User’s browser to our containerised application. We need to do some final setup on the ECS side to ensure those containers are running and orchestrated.
Add your Alias Record
We need to ensure our domain name aliases to the load balancer. This is now the route to our application for users.
You want Simple routing, then click Next. On the following screen, click Define simple record. Under Record type in the next screen, choose A (not AAAA). Under Value/Route traffic to, choose Alias to Application and Classic Load Balancer. A new drop-down appears allowing you to select the region. Following this, a third drop-down will appear which should have the Load Balancer you just configured as an option. Choose it and then click Define simple record.
Alas, you won’t let be able to go to your application using this URL just yet. We still have a little bit of configuration to do.
Create ECS Cluster
A quick note: this tutorial was written on 6th March 2022 using the new ECS Console cluster experience. This new one defaults to Fargate for the time being. If you’re on the older console version, you might need to select Fargate as an option before you continue with the next step.
Choose Clusters on the left and then Create Cluster on the right in the ECS Console. Choose a meaningful Cluster name, leaving the other options as their default. Click Create.
That’s it. It takes a minute or so to complete.
Create Service
Now we create our ECS Service, which will orchestrate our Task. Once the Cluster appears on the ECS Console, click on it and choose Deploy on the bottom right.
Under deployment configuration, select your Task definition from the Family drop-down. Select a meaningful name for your service and leave the desired tasks at 1.
Skip the Load balancing section. We’ve created our ALB already in the steps above. If you try to add it in here as an existing Load Balancer, AWS Console unfortunately forces you to create a new Target Group, which we don’t want to do.
Ensure you’re using the Security Group we created above in the Networking section. Choose Deploy. This deployment takes a few minutes.
Configure Target Group
The Target Group is the configuration that tells your Load Balancer where to route inbound traffic. In the case of this solution, we need to send it to the ECS container running our application.
We’ll need that Container’s IP address. In the ECS Console, select your Cluster, then your Service, and then the Configuration and tasks tab. Here, you should see a single running task if things are going well. Click on the value under Task, and on the right, you will see your Private IP. Click on the handy Copy icon, and then navigate back to the EC2 Console.
In the EC2 Console, choose Target Groups under the Load Balancing section on the left. Click on your TG there, and then on Register Targets in the bottom right.
Under step 2, paste the Private IP in the IPv4 address box. Ensure the Ports value is 3000, then click on Include as pending below before finishing with Register pending targets. If you’re successful, the Target Group is now forwarding traffic to your Container on Port 3000. Test it by going to your domain name.